
- アーキテクチャ概要
- 複数ノード用の Redis と PostgreSQL。
- 前提条件GitLabのマルチノードサイトが2つ、独立して動作していること。
- GeoプライマリサイトとなるGitLabサイトの設定
- もう一つの GitLab サイトを Geoセカンダリサイトに設定します。
複数ノードのGeo
この文書では、マルチノード設定で Geo を実行するための最小限のリファレンスアーキテクチャについて説明します。マルチノードのセットアップが説明されているものと異なる場合、これらの手順をあなたのニーズに合わせることが可能です。
アーキテクチャ概要
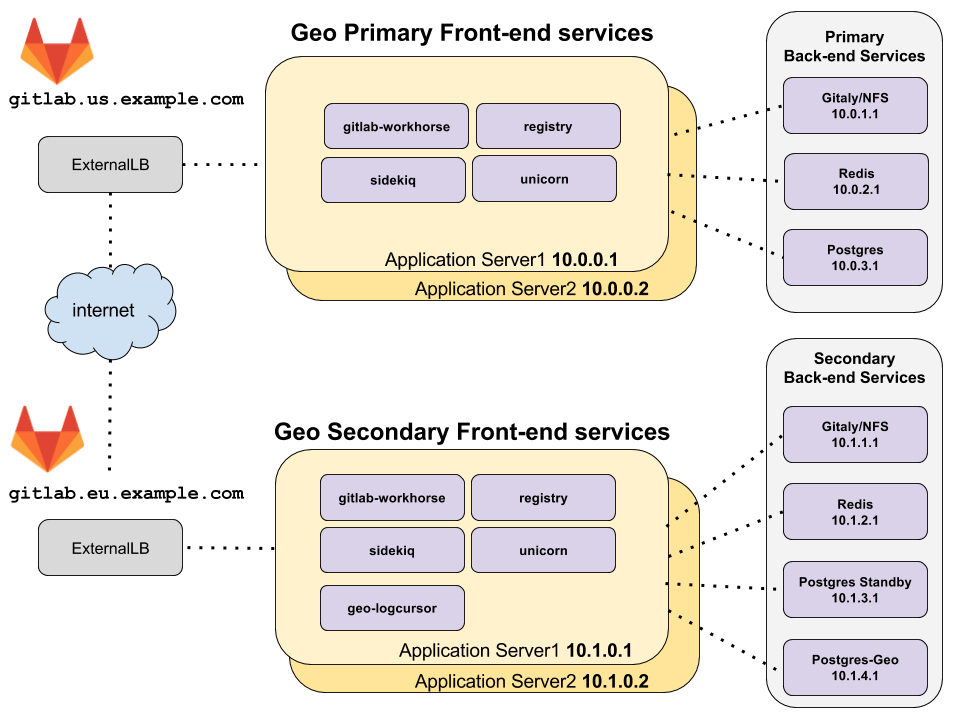
上のトポロジーでは、プライマリサイトと セカンダリサイトがそれぞれ別の場所にあり、プライベートIPアドレスを持つ仮想ネットワーク上にあると仮定しています。ネットワークは、ある地理的な場所にあるすべてのマシンが、非公開IPアドレスを使って互いに通信できるように設定されています。IP アドレスは一例であり、デプロイのネットワークトポロジーによって異なる場合があります。
上の例では、2 つの Geo サイトに外部からアクセスする唯一の方法は、gitlab.us.example.com とgitlab.eu.example.com の HTTPS です。
複数ノード用の Redis と PostgreSQL。
PostgreSQLとRedisを複数ノードで使用する場合、この設定の複雑さが増すため、このGeo複数ノード用ドキュメントでは扱っていません。
Linux パッケージを使用した PostgreSQL クラスターと Redis クラスターのマルチノードのセットアップの詳細については、こちらをご覧ください:
前提条件GitLabのマルチノードサイトが2つ、独立して動作していること。
1つのGitLabサイトがGeoプライマリサイトとして機能します。GitLab リファレンスアーキテクチャのドキュメントを使ってセットアップしてください。Geoサイトごとに異なるリファレンスアーキテクチャサイズを使用することができます。すでに稼働中のGitLabインスタンスがある場合は、それをプライマリサイトとして使うことができます。
2つ目のGitLabサイトはGeoセカンダリサイトとして機能します。繰り返しになりますが、GitLabリファレンスアーキテクチャのドキュメントを使って設定してください。サインインしてテストするのは良い考えです。ただし、プライマリサイトからレプリケートする過程でデータが消去されることに注意してください。
GeoプライマリサイトとなるGitLabサイトの設定
以下の手順で GitLab サイトを Geoプライマリサイトとして使用できるようにします。
ステップ 1:プライマリフロントエンドノードの設定
-
/etc/gitlab/gitlab.rbを編集し、以下を追加してください:## ## The unique identifier for the Geo site. See ## https://docs.gitlab.com/ee/administration/geo_sites.html#common-settings ## gitlab_rails['geo_node_name'] = '<site_name_here>' ## ## Disable automatic migrations ## gitlab_rails['auto_migrate'] = false
これらの変更を行った後、GitLabを再設定して変更を有効にします。
ステップ 2: サイトをプライマリサイトとして定義します。
-
フロントエンドノードの1つで以下のコマンドを実行します:
sudo gitlab-ctl set-geo-primary-node
もう一つの GitLab サイトを Geoセカンダリサイトに設定します。
セカンダリサイトは他のGitLabマルチノードサイトと似ていますが、3つの大きな違いがあります:
- メインのPostgreSQLデータベースは、GeoプライマリサイトのPostgreSQLデータベースの読み込み専用レプリカです。
- 各 Geoセカンダリサイトには、「Geo トラッキングデータベース」と呼ばれる追加の PostgreSQL データベースがあり、さまざまなリソースのレプリケーションと検証の状態を追跡します。
- 追加のGitLabサービスがあります。
geo-logcursor
そのため、マルチノードのコンポーネントを一つずつセットアップし、典型的なマルチノードのセットアップからの逸脱を含めています。しかし、Geoセットアップの一部でないかのように、真新しいGitLabサイトを最初に設定することを強くお勧めします。こうすることで、GitLabサイトとして動作していることを確認することができます。そして、Geoセカンダリサイトとして使うために修正するのはそれからにしましょう。こうすることで、Geo設定の問題と無関係な複数ノード設定の問題を切り分けることができます。
ステップ 1: GeoセカンダリサイトのRedis と Gitaly サービスの設定
Geo 以外のマルチノードのドキュメントを使用して、以下のサービスを設定します:
- GitLab 用 Redisを複数ノード用に設定します。
- Geo プライマリサイトから同期されたデータを保存するGitaly。
ステップ2: PostgreSQLストリーミングレプリケーションの設定
Geo データベースレプリケーションの手順に従ってください。
外部のPostgreSQLインスタンスを使う場合は、外部のPostgreSQLインスタンスを使ったGeoも参照してください。
ステップ 3: Geoセカンダリサイト上の Geo トラッキングデータベースの設定
Geo トラッキングデータベースをマルチノードの PostgreSQL クラスターで実行したい場合は、トラッキング PostgreSQL データベース用の Patroni クラスターの設定に従ってください。
Geoトラッキングデータベースをシングルノードで実行したい場合は、以下の手順に従ってください。
-
GitLab アプリケーションがトラッキングデータベースにアクセスするために使用するデータベースユーザーのパスワードの MD5 ハッシュを生成します:
ユーザー名(デフォルトでは
gitlab_geo)はハッシュの内部に組み込まれます。gitlab-ctl pg-password-md5 gitlab_geo # Enter password: <your_password_here> # Confirm password: <your_password_here> # fca0b89a972d69f00eb3ec98a5838484次のステップでは、このハッシュを使って
<tracking_database_password_md5_hash>を埋めます。 -
Geo トラッキングデータベースを実行するマシン上で、
/etc/gitlab/gitlab.rbに以下を追加します:## ## Enable the Geo secondary tracking database ## geo_postgresql['enable'] = true geo_postgresql['listen_address'] = '<ip_address_of_this_host>' geo_postgresql['sql_user_password'] = '<tracking_database_password_md5_hash>' ## ## Configure PostgreSQL connection to the replica database ## geo_postgresql['md5_auth_cidr_addresses'] = ['<replica_database_ip>/32'] gitlab_rails['db_host'] = '<replica_database_ip>' # Prevent reconfigure from attempting to run migrations on the replica database gitlab_rails['auto_migrate'] = false
これらの変更を行った後、GitLabを再設定して変更を有効にします。
外部のPostgreSQLインスタンスを使う場合は、外部のPostgreSQLインスタンスを使ったGeoも参照してください。
ステップ 4: Geoセカンダリサイト上のフロントエンドアプリケーションノードの設定
上の最小アーキテクチャ図では、GitLabアプリケーションサービスを実行しているマシンが2台あります。これらのサービスは設定で選択的に有効にします。
GitLab Railsアプリケーションノードを、リファレンスアーキテクチャで説明されている関連するステップに従って設定し、次に以下の変更を加えます:
-
Geoセカンダリノードの各アプリケーションノードで
/etc/gitlab/gitlab.rbを編集し、以下を追加します:## ## Enable GitLab application services. The application_role enables many services. ## Alternatively, you can choose to enable or disable specific services on ## different nodes to aid in horizontal scaling and separation of concerns. ## roles ['application_role'] ## `application_role` already enables this. You only need this line if ## you selectively enable individual services that depend on Rails, like ## `puma`, `sidekiq`, `geo-logcursor`, and so on. gitlab_rails['enable'] = true ## ## Enable Geo Log Cursor service ## geo_logcursor['enable'] = true ## ## The unique identifier for the Geo site. See ## https://docs.gitlab.com/ee/administration/geo_sites.html#common-settings ## gitlab_rails['geo_node_name'] = '<site_name_here>' ## ## Disable automatic migrations ## gitlab_rails['auto_migrate'] = false ## ## Configure the connection to the tracking database ## geo_secondary['enable'] = true geo_secondary['db_host'] = '<geo_tracking_db_host>' geo_secondary['db_password'] = '<geo_tracking_db_password>' ## ## Configure connection to the streaming replica database, if you haven't ## already ## gitlab_rails['db_host'] = '<replica_database_host>' gitlab_rails['db_password'] = '<replica_database_password>' ## ## Configure connection to Redis, if you haven't already ## gitlab_rails['redis_host'] = '<redis_host>' gitlab_rails['redis_password'] = '<redis_password>' ## ## If you are using custom users not managed by Omnibus, you need to specify ## UIDs and GIDs like below, and ensure they match between nodes in a ## cluster to avoid permissions issues ## user['uid'] = 9000 user['gid'] = 9000 web_server['uid'] = 9001 web_server['gid'] = 9001 registry['uid'] = 9002 registry['gid'] = 9002
postgresql['sql_user_password'] = 'md5 digest of secret' を設定した場合、gitlab_rails['db_password'] とgeo_secondary['db_password'] には平文のパスワードが含まれていることに注意してください。これはRailsノードがデータベースに接続するために使用されます。postgresql['md5_auth_cidr_addresses'] 設定に現在のノードのIPがリストされていることを確認してください。これらの変更を行った後、GitLabを再設定して変更を有効にします。
アーキテクチャ概要トポロジでは、以下のGitLabサービスが “frontend “ノードで有効になっています:
geo-logcursorgitlab-pagesgitlab-workhorselogrotatenginxregistryremote-syslogsidekiqpuma
フロントエンドのアプリケーションノードでsudo gitlab-ctl status を実行して、これらのサービスが存在することを確認してください。
ステップ 5: Geoセカンダリサイトのロードバランサーのセットアップ
上の最小限のアーキテクチャ図では、アプリケーションノードにトラフィックをルーティングするために、各ジオグラフィックロケーションにロードバランサーを示しています。
詳しくは、複数ノードを持つGitLabのロードバランサーをご覧ください。
ステップ 6:セカンダリサイトのバックエンドアプリケーションノードの設定
上記の最小アーキテクチャ図では、すべてのアプリケーションサービスが同じマシン上で一緒に実行されています。しかし、複数のノードを使用する場合は、すべてのサービスを個別に実行することを強くお勧めします。
例えば、Sidekiqノードを上記のフロントエンドアプリケーションノードと同様に設定し、sidekiq サービスのみを実行するように変更することができます:
-
Geoセカンダリサイトの各Sidekiqノードの
/etc/gitlab/gitlab.rbを編集し、以下を追加します:## ## Enable the Sidekiq service ## sidekiq['enable'] = true gitlab_rails['enable'] = true ## ## The unique identifier for the Geo site. See ## https://docs.gitlab.com/ee/administration/geo_sites.html#common-settings ## gitlab_rails['geo_node_name'] = '<site_name_here>' ## ## Disable automatic migrations ## gitlab_rails['auto_migrate'] = false ## ## Configure the connection to the tracking database ## geo_secondary['enable'] = true geo_secondary['db_host'] = '<geo_tracking_db_host>' geo_secondary['db_password'] = '<geo_tracking_db_password>' ## ## Configure connection to the streaming replica database, if you haven't ## already ## gitlab_rails['db_host'] = '<replica_database_host>' gitlab_rails['db_password'] = '<replica_database_password>' ## ## Configure connection to Redis, if you haven't already ## gitlab_rails['redis_host'] = '<redis_host>' gitlab_rails['redis_password'] = '<redis_password>' ## ## If you are using custom users not managed by Omnibus, you need to specify ## UIDs and GIDs like below, and ensure they match between nodes in a ## cluster to avoid permissions issues ## user['uid'] = 9000 user['gid'] = 9000 web_server['uid'] = 9001 web_server['gid'] = 9001 registry['uid'] = 9002 registry['gid'] = 9002同様に、
geo_logcursor['enable'] = trueでgeo-logcursorサービスのみを実行し、sidekiq['enable'] = falseで Sidekiq を無効にするようにノードを設定できます。これらのノードはロードバランサーに接続する必要はありません。